A properly installed roof protects your home from the elements and extends the lifespan of your shingles. Learning how to install roof shingles the right way can prevent leaks and future repairs. While installing shingles requires precision, having the right materials and following a structured approach makes the job more manageable.
This guide walks through each step, from preparing the roof to finishing the final layer.
Why Shingles Are an Effective Roofing Material
Shingles are one of the most popular roofing materials because they offer durability, affordability, and versatility. They provide strong protection against various weather conditions, including heavy rain, wind, and snow.
Asphalt shingles, in particular, have a waterproof coating that helps prevent leaks and moisture damage. Their layered design allows for proper drainage, reducing the risk of standing water that could lead to roof deterioration.
Another advantage of shingles is their cost-effectiveness. Compared to other roofing materials like metal or tile, shingles have a lower upfront cost and require less maintenance over time. They are also relatively easy to repair or replace if damage occurs, making them a practical choice for homeowners looking for long-term value.
Shingles come in a variety of colors and styles, allowing homeowners to customize their roof’s appearance to match the overall aesthetic of their home. Their adaptability and reliability make them a trusted option for residential roofing.
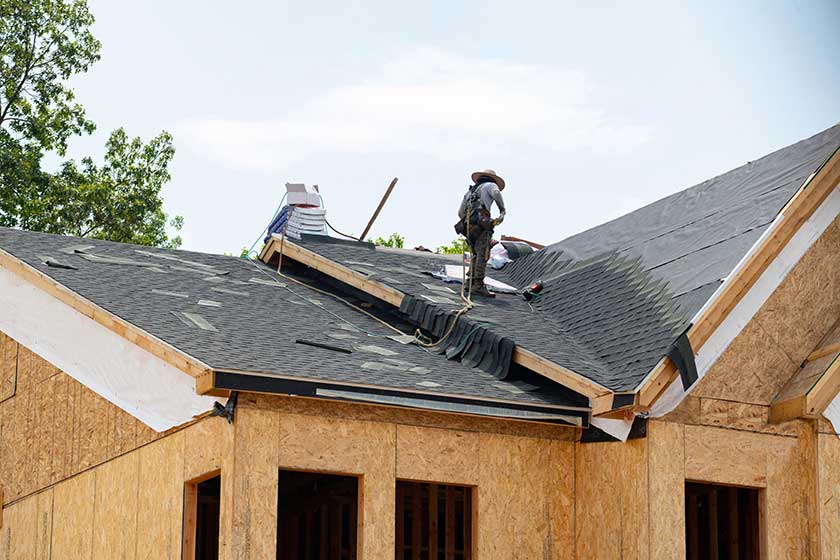
Prepare the Roof for Installation
Before installing shingles, you need a stable and debris-free surface. Start by removing old shingles using a roofing shovel or pry bar, making sure to dispose of all nails and leftover materials. Once the roof deck is exposed, check for signs of rot, mold, or structural weakness.
Any compromised sections should be replaced to prevent long-term damage. After ensuring a solid base, install a drip edge along the eaves to channel water into the gutters and protect the decking from moisture. Next, roll out a waterproof underlayment, overlapping each row to create a tight seal.
This layer acts as a barrier against leaks, adding extra protection in case of wind-driven rain or ice buildup. Secure the underlayment with roofing nails, making sure it stays smooth and free of wrinkles. Proper preparation is key to a durable roof, as it prevents shifting shingles and water damage over time.
Install the Starter Strip
A starter strip is the foundation for installing shingles correctly. This row reinforces the edges of the roof and protects against wind uplift. To create a starter strip, either cut the tabs off a three-tab shingle or use pre-cut starter shingles designed for this purpose.
Position the strip along the eaves, allowing for a slight overhang to direct rainwater into the gutters. Nail down the starter strip at even intervals, making sure each piece is securely fastened. Proper nail placement is important, as missing or misaligned nails can lead to loose shingles.
The adhesive on the starter strip also helps hold the first full row of shingles in place. If this layer is not aligned properly, the rest of the roof may appear uneven. A well-installed starter strip provides the necessary foundation for a uniform and long-lasting roofing system.
Lay the First Row of Shingles
Once the starter strip is in place, it’s time to begin laying the first full row of shingles. Position the first shingle so that it fully covers the starter strip and aligns with the roof’s edge. Work across the roof, ensuring each shingle is level and evenly spaced.
Nail shingles at designated spots, typically above the adhesive strip, using four to six nails per piece depending on wind exposure in your area. Avoid driving nails too deep, as this can damage the shingle or reduce its holding strength.
Using a chalk line helps keep the row straight, which is important for both appearance and function. Each shingle should slightly overlap the one below it, forming a waterproof seal. A properly laid first row sets the stage for the remaining shingles, ensuring they are positioned correctly and fit together seamlessly.
Continue Installing Shingles in Overlapping Rows
With the first row secure, continue working upward in overlapping rows. Each row should be offset from the one below it to prevent seams from aligning. This staggered pattern directs water away from vulnerable points, reducing the risk of leaks.
As you lay each row, check that the shingles are straight and flush with the roof’s surface. Use a consistent nailing pattern to keep them securely fastened. Nail placement is important; driving nails too high or too low can compromise the roof’s durability.
Work methodically across the roof, making sure shingles lie flat without gaps or lifted edges. As you near the roof peak, measure carefully to ensure the final row fits properly. Overlapping rows create a strong, water-resistant barrier that keeps the roof well-protected against rain, snow, and wind.
Shingle Around Roof Features like Vents and Chimneys
Roof features such as vents, chimneys, and skylights require special attention to prevent leaks. Cut shingles to fit snugly around these structures, leaving a small expansion gap. Install metal flashing around the base of each feature, ensuring it extends beneath the upper shingles and over the lower ones.
This layered approach directs water away from weak points, reducing the risk of moisture damage. Use roofing cement to seal the edges of the flashing and create a waterproof seal.
Nail flashing in place carefully, making sure it does not shift during installation. Properly sealing these areas is necessary for long-term roof performance. Ignoring these details can lead to leaks, mold growth, and costly interior repairs. Taking time to shingle around roof features correctly helps maintain the roof’s durability and prevents common weather-related issues.
Finish the Ridge with Cap Shingles
The final step to installing shingles is covering the peak with ridge cap shingles. This layer protects the highest point of the roof from wind, rain, and temperature fluctuations. Ridge cap shingles are specifically designed for this purpose, but standard shingles can be trimmed to fit if necessary. Bend each shingle slightly to match the shape of the ridge and overlap them for full coverage.
Secure each piece with nails, driving them in just below the overlap to hide nail heads from exposure. The last ridge cap shingle should be sealed with roofing cement to keep it secure. Proper ridge installation improves the roof’s overall appearance while providing a finished, professional look. It also prevents wind-driven rain from penetrating beneath the shingles, keeping the home dry and well-protected.
Final Inspection and Clean-Up
After installing shingles, perform a thorough inspection of the roof to check for any issues. Walk the perimeter of the home and look for misaligned shingles, loose nails, or exposed flashing. Make any necessary adjustments before considering the job complete.
Remove leftover materials, including nails and scraps, to keep the area clean and safe. Use a magnetic tool to pick up stray nails that may have fallen during installation. Clean out gutters to ensure proper drainage and prevent future water buildup. If any areas appear uneven or improperly sealed, address them before they cause problems.
A final inspection helps confirm that the roof is secure, visually appealing, and ready to withstand weather conditions. Taking the time to check for any mistakes ensures a successful installation and a longer-lasting roof.
Choose the Right Type of Shingles for Your Roof
Selecting the right shingles is just as important as the installation process. Asphalt shingles are the most common choice because they offer durability, affordability, and a variety of styles. Architectural shingles provide a layered look and better wind resistance, while three-tab shingles have a uniform design and lower cost.
Homeowners in areas with heavy snowfall or strong winds may benefit from impact-resistant shingles, which can withstand extreme weather. Lighter-colored shingles reflect sunlight and help keep homes cooler, while darker shingles absorb heat and may improve energy efficiency in colder climates.
Before installing shingles, consider the local climate, aesthetic preferences, and long-term durability. High-quality shingles reduce maintenance needs and extend the life of your roof.
Investing in a reliable brand helps protect your home from leaks, weather damage, and early deterioration. Consulting with a professional can also help determine which option best suits your home’s structure and environmental conditions.
Common Mistakes to Avoid When Installing Shingles
Even with proper planning, mistakes can lead to costly repairs or a shorter roof lifespan.
One common issue is improper nail placement. Nails should be positioned just above the adhesive strip to secure each shingle without puncturing it too deeply. Using too few nails can lead to loose shingles, while overdriven nails may damage the material. Another mistake is failing to stagger the shingle seams, which can allow water to penetrate and cause leaks.
Skipping the underlayment is another major problem, as this waterproof barrier helps protect the roof deck from moisture. Some homeowners also forget to install drip edges, which direct water away from the roofline and prevent rot.
Ignoring manufacturer guidelines or cutting corners on materials may result in early wear and tear. Taking the time to follow each step correctly reduces long-term maintenance and ensures a sturdy roof that holds up against the elements.
Why Proper Ventilation Is Important for Your Roof
Ventilation plays a key role in extending the life of your roof and preventing moisture buildup. Without proper airflow, trapped heat and humidity can lead to mold growth, shingle deterioration, and wood rot. Intake vents at the lower part of the roof allow fresh air to enter, while exhaust vents near the peak help push out excess heat and moisture.
Balanced ventilation improves energy efficiency by reducing the strain on heating and cooling systems. It also prevents ice dams in winter, which form when warm air melts snow that refreezes at the eaves.
Over time, poor ventilation can cause shingles to curl or break down faster than expected. When installing shingles, check that vents are properly placed and unobstructed. If attic insulation is blocking airflow, adjustments may be needed. A well-ventilated roof improves comfort inside the home and helps maintain the roof’s structural integrity for years to come.
Seasonal Roof Maintenance to Extend Shingle Lifespan
Regular maintenance helps prevent minor roof issues from becoming expensive roof repairs. In the fall, remove leaves and debris from gutters to keep water draining properly. In winter, watch for ice buildup that can put excess weight on the roof.
Spring is a good time to inspect shingles for signs of wear, such as cracks, curling, or missing pieces. Summer heat can cause shingles to expand, so checking for loose nails or warping is important. Moss and algae growth can also weaken shingles over time.
Cleaning the roof with a gentle solution or installing zinc strips can help prevent buildup. Checking flashing around chimneys and vents ensures that water is not seeping through weak spots.
Regularly inspecting and maintaining your roof keeps it in good shape year-round. If you notice damage, addressing it early prevents larger problems. Seasonal care helps your investment last longer and keeps your home well-protected.
How to Make Your Shingle Roof More Energy Efficient
A shingle roof can help improve energy efficiency when installed with the right materials and techniques. One of the best ways to reduce heat absorption is by choosing reflective or “cool” shingles that are designed to reflect sunlight rather than absorb it. These shingles help lower indoor temperatures, reducing the strain on air conditioning during warmer months.
Proper ventilation and insulation also play a major role in improving energy efficiency. A well-ventilated attic allows hot air to escape, preventing heat buildup that can make cooling systems work harder. Adding high-quality insulation beneath the shingles helps maintain indoor temperatures by reducing heat transfer. This keeps homes warmer in winter and cooler in summer, leading to lower energy costs.
Another effective method is applying a reflective roof coating, which enhances the heat resistance of shingles. This coating can help extend the lifespan of the roof while improving overall energy efficiency. By combining these strategies, homeowners can make their shingle roofs more environmentally friendly and cost-effective.
How Weather Conditions Affect Shingle Installation
Weather plays a significant role in how well shingles adhere to a roof. Cold temperatures can make shingles brittle, making them more likely to crack during installation.
Shingles also require warmth to seal properly, and working in low temperatures may prevent the adhesive strips from bonding. On the other hand, extreme heat can soften shingles, making them prone to scuffing or tearing when handled.
Windy conditions pose another challenge, as strong gusts can lift and misalign shingles before they are properly secured. Rain can also interfere with installation, as moisture can get trapped beneath the shingles, leading to mold growth or premature deterioration.
The best conditions for installing shingles are dry, mild days with moderate temperatures. Checking the forecast before starting the project ensures a smoother process and better long-term results. Proper installation in the right weather conditions extends the life of the roof and improves overall performance.
When to Call a Professional for Roof Installation
While some homeowners may feel comfortable tackling roofing projects themselves, professional installation offers several advantages. Experienced roofers follow precise techniques to prevent leaks and structural issues. They have the tools to install shingles efficiently and safely, reducing the risk of accidents. Professionals also know how to handle complex roof designs, such as steep slopes or multiple valleys.
If you are living in Maine and your home has existing damage, such as rotting wood or hidden leaks, a local asphalt roofing contractor in Maine can address these problems before installing shingles. Hiring a professional also saves time and reduces stress, as they can complete the project faster than a DIY approach. Quality workmanship helps avoid mistakes that may lead to premature repairs.
At Monastery Roofing, we offer roof repair and installation in Maine with expertise and attention to detail. For a new roof and reliable results, contact us to discuss your options and get a professional assessment.